How to tie guy lines
Guy lines are an integral part of any tent’s structure. However, they’re notoriously tricky to get the hang of, especially if you’re new to pitching a tent or unaccustomed to tying knots. Luckily, learning how to tie guy lines is simple. With the following steps you’ll have a sturdy, stable and well-ventilated tent as a reward – as well as a living space that is braced against any high winds or other bad weather conditions that may strike.

What is a guy line?
A guy line is a rope or cord that connects your tent to the ground. It usually attaches to a tent's wall, tarp or rainfly.
Why are guy lines important?
1. They create structure and stability.
Guy lines add rigidity to your tent’s structure, creating a stable and sturdy setup that won’t easily give in under wind, rain or snow.
In fact, some non-freestanding tents won’t stay upright at all without a set of guy lines.
2. They aid ventilation.
Guy lines help to prevent leaks and condensation because they keep the rainfly away from the tent walls. When the two touch, stuffy air will get trapped in your tent and form moisture.
3. You’ll have more space to unwind.
Guy lines tug on the outside of your tent and prevent the walls from caving inwards, meaning that there’s more space inside.
4. Guy lines support the tent’s rainfly, keeping the tent dry.
Unlike the tent itself, the rainfly doesn’t have the luxury of tent poles as a support. Guy lines are often the only thing that keeps a tent’s rainfly in place – without this structure, your tent is exposed to the elements and more prone to leaks.
How to tie a guy line
1. Locate the guy out loops on your tent.
Guy out loops will be positioned on the corners of your tent, often at the top or around the middle of the tent.
2. Tie one end of the guy line to the guy out loop using a secure knot.
Many tents already have guy lines attached to them, so this step is not always required.
If you need to attach your own guy lines, any knot you use must be secure, easy to undo and (ideally) easy to tighten or loosen as required.
We’d suggest using one of the following knots:
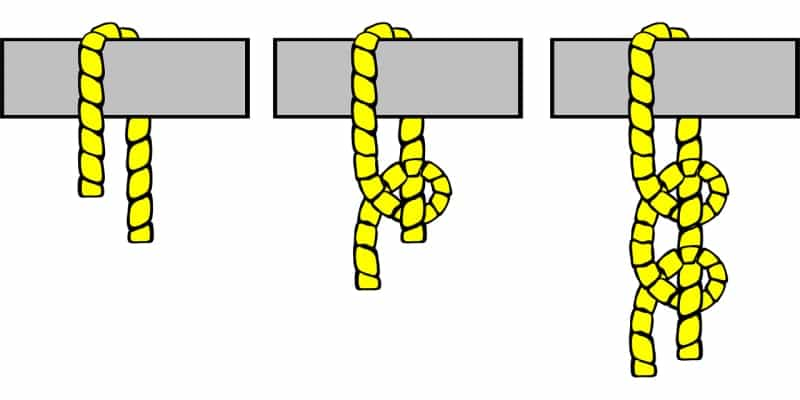
A two half hitches knot: This is our recommended knot, as it tightens when tension is applied and it’s straightforward to tie and untie.

· Moving counter-clockwise, create a loop in your guy line by passing the line through the guy out loop.
· Pass the free end of the guy line through the eye of your self-made loop (still moving counter-clockwise).
· Create another counter-clockwise loop underneath the first loop by passing the free end of the line around and up the standing line (the standing line is the cord underneath your original loop).
· Pull on the free end of the line to tighten your two half hitches knot.
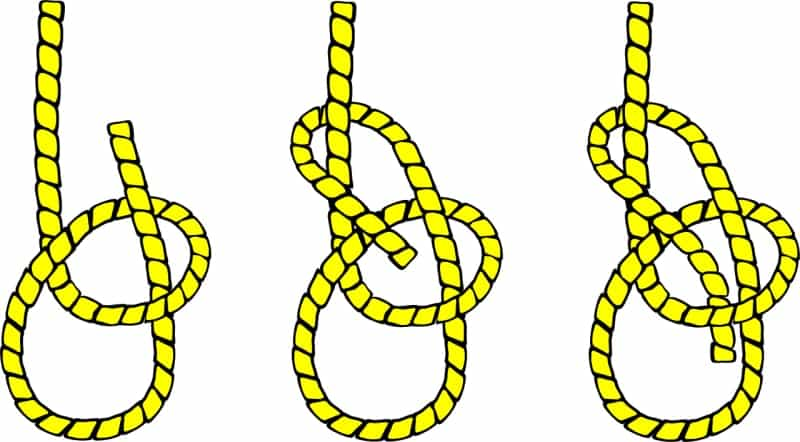
A bowline knot: This knot is simple to do and easy to untie. However, it is not adjustable, so we’d recommend trying a two half hitches knot first.

· First, make a small loop in your guy line by passing the cord through the guy out loop.
· Feed the free end of your guy line up and through the eye of the loop from the underside.
· Wrap the cord around the standing line (the cord underneath the loop) and back down through the line.
· Tighten the cord by tugging on the free end and holding onto the standing line.
3. Measure the distance between your guy line and tent stake/peg.
Once your guy line is attached, take the guy line out to the side of your tent at a 45-degree angle. Keep walking until the guy line is taut. Place your tent stake in that spot.
4. Hammer your tent stake into the ground.
Use a hammer or a hard object to hammer your tent pegs firmly into the ground.
5. Attach the free end of the guy line to the stake if there isn’t a loop already provided.
Use a two half hitches knot to attach the guy line to the stake, checking that it is properly secured and that the line is tight.
6. Repeat the process for all of your guy lines.
How tight should a guy line be?
The guy line should be taut. However, it shouldn’t be so tight that the tent is being pulled towards the ground. If your guy line is too tight, it could snap or damage your tent. There should be a very slight give in the line if you push on the cord.
Do I need additional guy lines for bad weather or high winds?
Using additional guy lines is like calling in extra soldiers – as long as they are properly set up, additional guy lines will add more support to the structure of your tent.
That being said, you should also take extra steps to protect your tent when you’re camping in bad weather, such as pitching your tent so that the lowest and narrowest side is facing the wind to deflect gusts more effectively, and positioning any doorways away from the wind to avoid air getting inside your tent and blowing it away.
With your guy lines correctly reinforced, you’ll be prepared to camp in all weather conditions, including a winter camping trip. For other pitching hacks, check out our guides to pitching a tent and choosing the best equipment.
Read our guide to putting up a tent
FAQ
What is a guy line?
A guy line is a rope or cord that connects your tent to the ground and attaches to a tent wall, tarp or rainfly.
Why are guy lines important?
Guy lines create stability, improve ventilation, create space and keep your tent dry by supporting a rainfly.
How tight should a guy line be?
The guy line should be taut but not so tight that the tent is being pulled towards the ground.
Do I need additional guy lines for bad weather?
Additional guy lines can help to protect against high winds or bad weather conditions.